


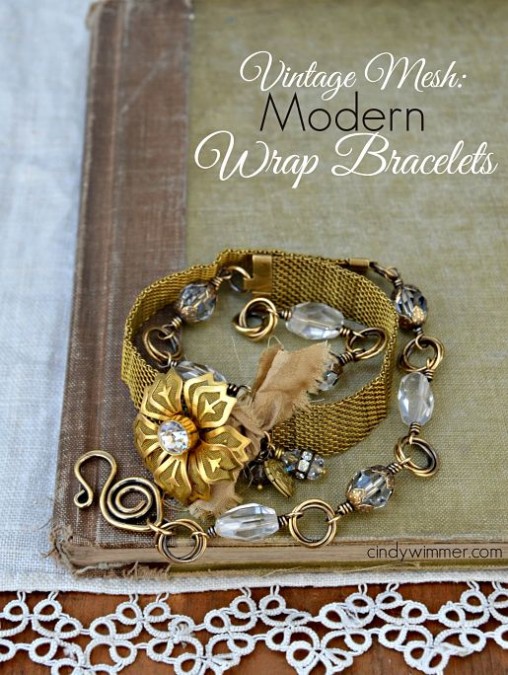

Hello!
I have a little something to share with my blog readers – a tutorial I created just for YOU. I know many of you can teach me a thing or two about wirework, but this is tutorial is for anyone out there just getting started with wire. Have you ever wondered how to create a one-of-a-kind clasp? Here’s a quick tutorial to help you create a clasp that can be used in your next bracelet or necklace design. All you need is a length of 16-gauge wire and your usual arsenal of tools! Let’s get started……


I hope this quick tutorial is helpful. Let me reiterate one of the final tips that I mention – using a tumbler. My tumbler has to be my absolute favorite “tool” when working with wire. If you give your clasps a good tumble (an hour or so), you’ll have a nice and sturdy clasp to be proud of. Please send me an email if you need further clarification on any part of this tutorial. I aim to please.

I’ve got one last photo to share – it’s my Bead Table Wednesday shot. This is an action shot trying to take pictures for this tutorial. I knew I wouldn’t be able to hold my pliers and my great big camera at the same time but I thought I’d give it a try. Needless to say demonstrating the steps with tools was out of the realm of possiblities for me. I needed my handy assistant.

Thank you for stopping by today. ‘See you around your bead table! 🙂
2014 Update: I hope that you found this tutorial helpful. I’m glad you found my blog, especially visitors from Pinterest. 🙂 If you would like more tips and tutorials on working with wire, please be sure to look for a copy of my book, The Missing Link – published by Interweave in Oct. 2013.


Easy peasy – great instructions, Cindy.
Love it! Especially the ‘messy’ wrap part. That is more my style since I cannot make a coil to save my soul! That whole hammering on the anvil would come in handy. I only have a block. And you are going to slap my wrists when I tell you that the Lortone tumbler I bought back in November is still in its box, taunting me whenevery I unearth it from the mess in my studio!
Enjoy the day!
Erin
I just love this–and it looks easy enough that even I could make it. I have a confession. I’ve had a tumbler for more than two years now and have never used it. Two reasons: I don’t do well with new gadgets, and I couldn’t afford the shot. Now it sits, forgotten, in my closet. Guess I’d better get it out and see if it works!
Cindy, you are so generous to share this with us – I’m definitely going to have a go (although I’m still not quite sure I have the hands to bend 16g wire!!). It’s a lovely clasp!
Thank you for sharing that tutorial! Sometimes I run out of clasps and it would be nice to make my own. This tutorial looks great for a beginner in wireworking…which is me!
thank you cindy for taking the time to make this to share! it is a beautiful design – and with instructions from you, one knows that they are doing something the right way… so glad you had a nice visit with lori!
WOW you did a lot of work today! And I love the tutorial. But why is it when YOU make a messy coil, it looks awesomely artsy, but when *I* make a messy coil, it just looks … messy? You are soooo good at the wire thing. I want to be you when I grow up! 🙂
I still have not gotten the tumbler you told me about! And I need to grrr. Thats the NEXT item! The list is never ending to Infinity. Like Buzz Light Year says to Infinity and Beyond lol! Great tutorial Cindy and the messy look!
This is great, Cindy, and I definitely want to try it. But…BIG but… I don’t have a tumbler. Is there any good substitute? I’d love one but I’m on a strict no-purchases plan until we hear what the CPA has to say about our tax situation (pray for us! heehee).
Great tutorial Cindy! I love the “messy” coil – it looks like a rose. Would you mind if I linked to this from my blog? I’m going to start up my Tutorial Tuesdays again.
Jo x
Great tutorial, thanks for posting it!
Hey Cindy what a great tutorial & i love the messy coil part it looks so artsy, and as for Sally’s question is Kerry Bogart’s book” Totally Twisted” she recommends if you don’t have a tumbler to put the small parts into an old sock and put it right into the washing machine i dont have my book right with me i forgot it at my dad’s but i will look it up tom. and come back and post the directions & Miss Erin you will be upset with yourself when u finally unpack your tumbler and see what you have been missing i got mine for Xmas and abso love love love!! it ttfn L:)
Cindy, I think the “messy” part of the coil is THE winner today! I’ve made these before but the messy part gives it a whole different perspective……it just proves being perfect isn’t all it’s cracked up to be.
Thanks for sharing! It’s a wonderful tutorial, and the photos are excellent!
Cindy, You’re right, this is a great tutorial for a beginner, cause that would be me. I don’t work with wire at all, but would love to make one or three of these. Since Erin’s not going to use her tumbler, I think I need to borrow it from her! But the tip about the sock and washing machine is great!
Thanks so much!
These are great, Cindy. You make them look so easy. I love the organic … and forgiving … nature of the “messiness”. I think it’s great you enlisted the aid of a helper … how special is that?!!
<3
Thanks for sharing
oh and which tumbler should we get that is not too costly and best place to get the shot? Thanks
Shannon C
I’m glad this project might be helpful for some new to wire!
About the tumbler…yes, there are options for workhardening the metal (to help ensure the clasp is sturdy and not flimsy). If you do not have a tumbler, you can also workharden the clasp by tapping it repeatedly with a rubber or rawhide mallet on a steel bench block or anvil. This will help strengthen the wire. This does not add that wonderful sheen that you can get with a tumbler however!
As you can see I’m very partial to a tumbler. I must confess I left mine in the box for several months as well when I first received it. Wasn’t quite sure what to add to it (how much shot? how much water? how many pieces of jewelry could I add?). Once I went for it though, I realized it was so much easier than I thought. Now my tumbler is a permanent fixture – as my husband calls it – in our kitchen! I just might have to do a tumbler tutorial soon….. 🙂
Cindy, Thank you for this tutorial. I was just thinking that I needed something spify for a clasp for a new project and here it is. I love it. Linda
Love these! Thanks for sharing, you wire wizard! Tumbler is still on my wish list, but my supplier is constantly out, when I have the budget… Sigh!
What a wonderful tutorial. I’m heading straight to my bead table and give it a whirl. Thanks.
I like the messy part too…I usually pound out the middle flat…but I think I like this better…see, you can teach some of us oldies a thing or two…thank you!
Cindy, this is fabulous! I’ve tried a few times to make my own clasps, but haven’t really succeeded. This inspires me to give it another try!
Thank you! It is very useful tutorial!!
giogiò
Thank you for the tutorial! I can’t say thank you enough for all the help you have given me. Next on my list is the tumbler…
Nice! Thank you for this great tutorial. I think my tumbler might just be my favourite tool as well. I use it for everything and love that ocean sound of the shot moving in it.
thanks for sharing Cindy!!
Beautiful tutorial Cindy! The pictures are great! I definitely want to give this one a try. I’ve only made simple S hooks in the past. I love the natural rustic style of this clasp! I have all my tools and wire – just need a tumbler. : )
What a great tutorial. For some strange reason – they remind me of little goddesses. I agree with Lori Anderson’s comment – I want to be you when I grow up. My messy turns out messy too!!!
What nice thing to do, I am sure this will help up the people that are new at this.. Your clasp is beautiful. Lynn
What a great tutorial Cindy! Thanks for sharing!
Yea, I agree the tumbler might not be my favorite tool, but definately the most used!
This is a great tutorial, I’m glad I ran across it, I’ll share it! Love your blog!
Thanks for this! Love this little clasp & so easy and quick!
Sue
🙂
Thank you for this tutorial…I am planning on practicing this weekend!!
I’m going to have to break down and buy a tumbler. You’ve convinced me! But first, I need to use my new dapping set. I think that’s the rule–no new tools until you’ve used the last one at least once!
This is an amazing tutorial Cindy, thank you so much for putting it together! Being that percentage of people who are completely new to the wire world and seeing as haven’t really done a whole lot of it yet, I really appreciate it 😀
I’m excited to try it out! Hopefully soon 🙂
VERY cool!! Thanks so much for the tutorial!!
I adore this tutorial Miss Cindy & the handy 3rd hand couldn’t be cuter or chubbier! I will be coming back again soon with my equipment & wire in hand.
Thanks,
Susie
Thanks so much for this!!! Your instructions were so very easy to follow. I love working with wire, but don’t do much with it yet…but this is something that I can do!
Question…where can I get a tumbler…or is it the same as a rock tumbler?
Maryanne
Thanks so much for the solution for a bracelet closure that I have been struggling with for sometime. All my previous ideas weren’t what I wanted. This is absolutely perfect!
Candy
I just love this! I still want to try your copper flower rossettes from wire style too!
Stopping by after seeing a link to your page from Jo at daisychain desings. Fab tutorial!! Thanks for sharing.
Gemxxx
Great tutorial. Thanks so much for the instructions. Love the look. I’ve been thinking about a tumbler, just haven’t taken the plunge yet.
The question was asked if I the tumber I use was the same as a rock tumbler. It is similar but a jewelry-grade tumber, NOT one bought at a craft store. I highly recommend a Lortone tumbler (a single barrel is just fine). When you buy a quality product like a Lortone, you’ll be happy with the results for years to come. I’ve been using the same tumbler for about 5 years and it is reliable and works like a champ!
nice one ….i too hv tried it ….
Wow, this is really nice! Thanks so much for the tutorial. I just clicked over from Daisy Chain Designs and I’m so glad I did. I would love to link to this if you didn’t mind.
Thanks for sharing this great tutorial. A few months ago I was looking for some good handmade clasp tutorials and this one is perfect! What kind of tumbler do you suggest I get. I have looked at them at hobby lobby but didn’t know if that was the kind to get if you were going to use it a lot. Thanks again for posting! 🙂
How did I miss this the first time? I love your “messy’ work and have had fun interpreting it in some of my copper pieces.
Thanks for the tutorial Cindy! I’m in lust with spirals of any kind, and this is really cool. As a beginning wireworker, I can follow this easily, and have most of the tools. Only one question~how many gazillions of dollars are we talking for a tumbler? Sources please?
Lori
dear cindy, thank you for your interesting blog, I re-blogged this tutorial at http://1129designorecchinigioielli.blogspot.com/2011/05/spiral-wire-clasp-tutorial-tutorial.html with a little variation for earrings
I hope you don’t mind, if so I’ll remove 🙂
peace&love
nicoletta (italy)